App Prototyping? What is the first thought that comes to your mind? Rough sketch, shaping client’s requirements, designing app flow, I guess many…
I have come across many mobile app designers that mix prototyping and wireframe and think to have a similar meaning. But to your notice, prototyping and wireframing are two different approaches to any designing process. Let’s see what is App Prototyping and how it is different from wireframing.
What is Mobile App Prototyping
App prototyping is the process that interactively defines the app’s workflow (working app model). You include all swipes, clicks, and drags and present it in the form of an app demo or proof of app concept (POC).
Now you understand what App prototyping is, let’s see what is Wireframing
What is Wireframing
Wireframing is the process of defining app flow, drawing a rough sketch of screens on paper using wireframing tools.
When I was an iOS developer, I saw my Team Leader creating various screens in the Xcode platform using a storyboard application. At that time, I was new to the developing field and couldn’t understand what he was doing. He was simply creating different screens in one view placing buttons, and connecting those screens using clickable events. I was really amazed at his approach of instant reply to the client.
Later, when I was asked to study the requirements and create a flow, I learned that it’s known as app prototyping. It was simple to create a proof of the app concept on the storyboard. I thought this was it. But, app prototyping holds significance to any app during the designing and developing process, and this is what I understood while going through various articles.
Significance of App Prototyping
- Fix design issues, evaluate app ideas and essential interactive design concepts.
- Hassle-free app development saves you valuable time and money.
As penned by JAKOB NIELSEN in a famous article
“The most common estimate is that it’s 100 times cheaper to make a change before any code has been written than it is to wait until after the implementation is complete.”
Fix Design Issues:
Prototyping acts like a simple system that helps you solve design issues before focusing purely on coding. It enables you to address the app concept, features, interactions, and flow.
Evaluate app ideas:
App Prototyping connects you with end-users and helps you speculate end-users ’ designing expectations while using the app. You may need to create different designs using different color schemes and layouts during this process. Each design gets integrated into the mobile and analyzed. The one that soothes the eyes and is easy to navigate, giving ultimate user experience gets approved.
Communicative design concepts:
Applications that guide and interact with end-users have more weight than the apps made purely for fun and entertainment because these apps contain a purpose. Prototyping for such apps is a must. If you miss a screen while designing or developing, the chances of your app going down line increases.
You have probably got an idea of why app prototyping (Mobile App Wireframe) is so important to any app design.
One more interesting corner would talk about is the stages, let’s take a look at them
The four stages of App Prototyping
Let us understand each of these four mobile app prototyping stages in brief.
Understanding the client’s requirement:
Usually, this is what we get from the client’s end: Scope document, feature list, and app reference links. Going through all these documents and getting deep insights, the project manager calls for a brainstorming session. This involves the presence of you (mobile app designer) and sometimes a business analyst. The designer understands the requirement and draws a flowchart on paper under the guidance of the project manager. There comes an end to this session.
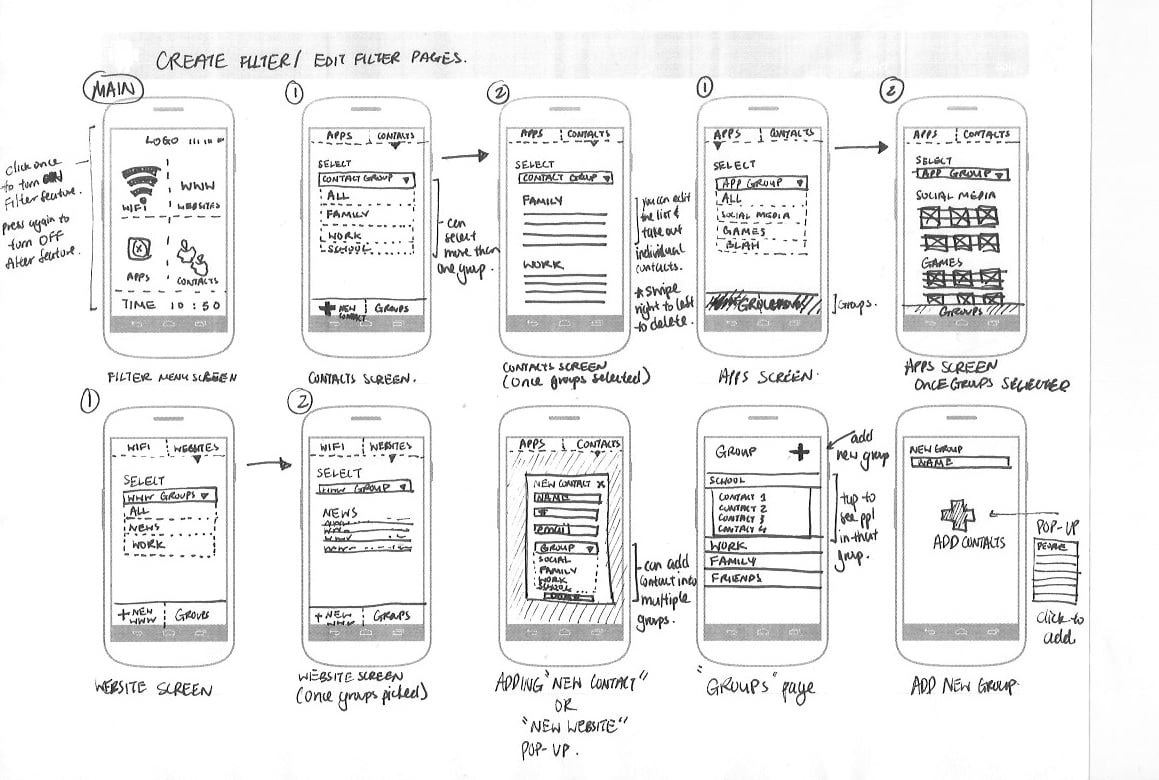
Wireframing:
Once you have a basic idea of how the app will flow, you start sketching the rough screens on paper or using wireframe tools, including widgets and different layouts. At this stage, you make the end-user understand the navigation of the app using keynotes and not the look & feel of the app. For instance, on click of login, the login screen appears.
Defining visual effects:
Once all the functionalities are mapped, you start designing the actual screens. The selection of color schemes, the button titles, widget placing, message pop-ups, creation of different icons, screen transitions, animations, and other visual effects are added to make the app screens more impressive and effective.
The Final touch:
At this last stage of the App Prototyping process, you test the transitions, animations, and interactions (clickable events), cross-check the final screens with the flow, make the screens more soothing and send it to the app developer or project manager for re-check. If required, you modify the screens and give them a final touch.
You have understood its significance, stages, and now it turns to let your fingers hold a stylus to create screens that interact. I know, with so many prototyping tools rolling in the market, you may find it difficult which one to pick and which one to leave. But first, ask yourself the following question.
- How long will it take me to learn this tool?
- For which platform, I need a prototyping tool? – Web, iOS, or Android app designing
- The prototyping precision
- Can I share my designs with others?
- A requirement of Professional experience
- How much will the tool cost me?
Therefore, here’s a sneak peek of the best 4 prototyping tools for 2022 and beyond.
#1 InVision:
Price:
The pricing plan is divided into five sections.
Free – For Individuals and small teams, free forever
Pro – For the cross-collaborative team, $7.95 per user/per month
Enterprise – For organizations with advanced needs, quote base
Prototyping for:
Websites, Web Apps, iOS, Android, Apple Watch, Android Wear.
Description:
InVision is a web-based prototyping tool allowing you (designers) to create spellbinding interactive mockups for web and mobile projects. You cannot create screens directly on Invision. Instead, you need to upload the static designed screens and then add hotspots to transfigure them into interactive mockups.
Besides, you can sync your photoshop or sketch files and add your own prototype in real-time, making it look authentic and soothing.
Features:
InVision is wrapped with user-centric features, including preview mode, commenting, version control, and file syncing. You can add transitions, animations, and gestures that it provides in plenty and let the design speak. It allows you to sync design files from your favorite storage tools, helping you to make your entire design productive from start to finish. It supports PNG, JPEG/JPG, GIF, AI, and PSD file formats. By the way, it is an amazing collaboration app prototyping tool that seeks feedback from clients and end-users.
Official Website:- inVisionapp.com
#2 Marvel
Price:
The pricing plan is divided into four sections:
Free: Free forever – Unlimited Projects- Unlimited comments for first 3 projects only
Pro: Monthly charges are $10 per month for unlimited projects- unlimited comments- allows to download offline prototypes as ZIP/PDF and Android- Password Protect Prototypes- Remove Marvel Branding
Team: Monthly charges are $30 per month for unlimited projects- unlimited comments- allows to download offline prototypes as ZIP/PDF and Android- Password Protect Prototypes- Remove Marvel Branding – download offline prototypes for iOS.
Enterprise: Charges are quote based for unlimited projects- unlimited comments- allows to download offline prototypes as ZIP/PDF and Android- Password Protect Prototypes- Remove Marvel Branding – download offline prototypes for iOS- Organise users into Teams – User Roles-Centralised Billing.
Prototyping for:
iOS & Android
Description:
Marvel is an ultimate browser prototyping tool that eases your prototyping process. Simply sign in to the account and access the area where you can experience creating your first prototype.
Features:
Unlike InVision, Marvel has limited transitions, animations, and gesture class libraries. You can change background colors and resize images in addition to having access to 17 vivid templates for prototyping. You can even optimize your designs device-specific.
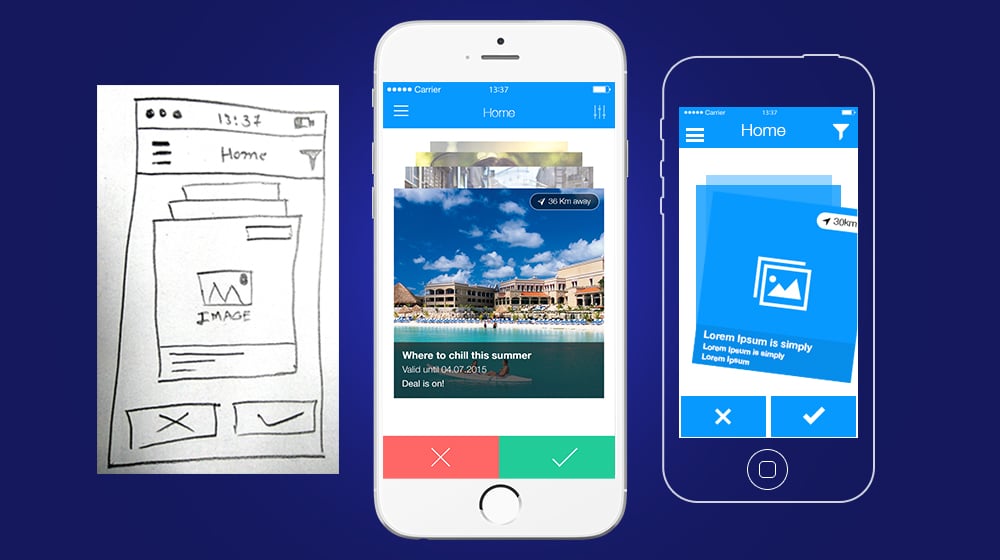
The best part of this easy-to-use and learn app prototyping tool is a companion app feature that lets you transform your sketch designs into a prototype just by clicking the design’s image. And, as such your images are synced with the Marvel account. Therefore, you can create quick mockups for experimentation even before designing a single layout in Photoshop or Sketch.
Lastly, you can sync design files from Google drive, box, sketch, or Dropbox and remember the files should be in PSD, GIF, or JPEG format.
Official Website:- Marvelapp.com
#3 JustInMind
Price:
Free: Free trial version is available for you to have a tour of how JustInMind works.
Standard: For individuals and teams, $14 per user/per month.
Professional: For advance sharing options, $29 per user/per month.
Enterprise: For full control and collaboration, Quote-based.
Prototyping for:
Web and Mobile Apps (Android, Windows, Blackberry & iOS)
Description:
If you are searching for an all-in-one app prototyping tool, your search ends here. JustInMind is a perfect tool for designers to design, prototype, and collaborate.
Features:
JustInMind allows you to design mockups for web and mobile apps by selecting design elements from a vast UI library. The widget library is customized according to the device template you pick and integrate into your design. Once you have finalized your layout, you can add motions, animations, and gestures from the pre-existing widget library. You can even add CTRs, checkboxes, lists, and parallax layouts and also there are tons of other widgets listed in the library which you include ensuring that the library you opt for was the best one you can have for your design.
For beginners, there are a number of video tutorials available on the shelf, helping you to make your design mockups impactful and impressive at the same time.
Official Website:- Justinmind.com
#4 Balsamiq
Price:
A single-user license is for $89, and multi-user license is for $178
Whereas its pricing changes according to the number of projects you choose. To get the exact idea visit its pricing plan.
Prototyping for:
Desktop & Web Apps
Description:
Balsamiq is a quick wireframing tool that allows you to design your wireframes quickly and efficiently. It’s similar to designing screens on paper (low precision). There is no need to have a good experience while using this hand-sketched tool. Simple to use and easy to understand.
Features:
Balsamiq offers a wide array of design elements allowing you to make your design look stylish. It gives you an experience of using a whiteboard while sketching but on the computer. It is easy to iterate and get feedback helping you to enhance your designs and improve the user experience.
Official Website:– Balsamiq.com
In Closing
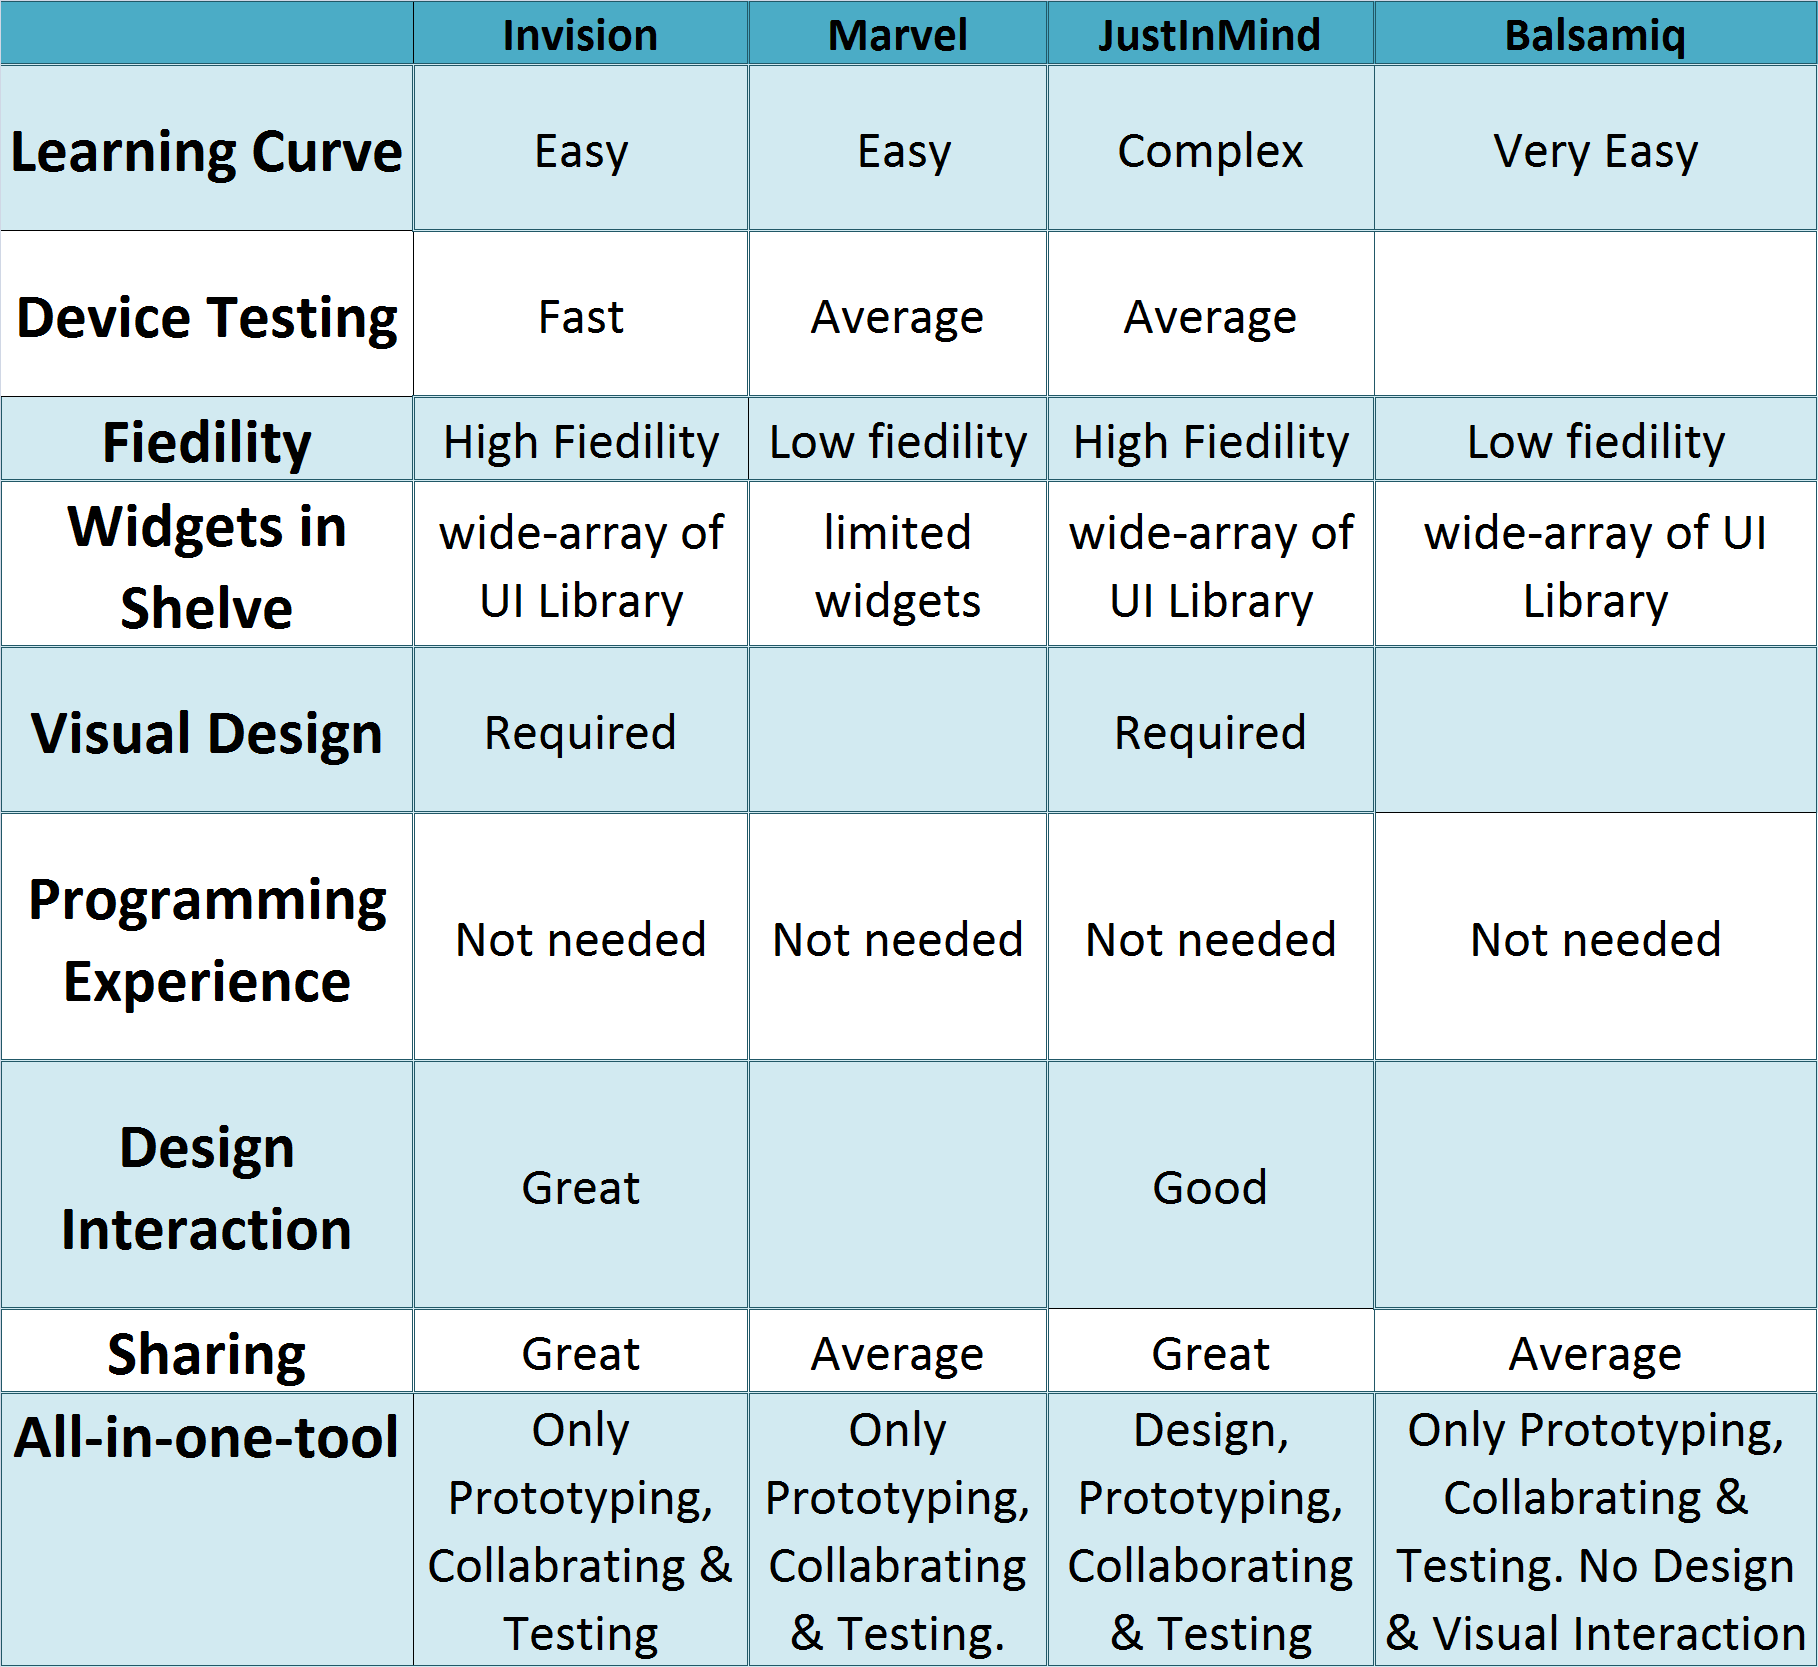
The abrupt ending won’t work. Let’s compare the above tools and see which one wins. But, it’s you who is going to decide which app prototyping tool will best fit you.
Compare Table